Monday, August 26, 2019

HR-1200R - A Great Tool for Analysis

I wanted to be sure that I paid tribute to a tool that is going to be super valuable as we seek to become experts in ceramic 3D printing.  But, I always wanted to have a bit of fun with the grandchildren when we got together over the weekend.

I have been using Helicon Focus for years beginning with the product photography I did for my daughter's artwork.  But, it's especially fun for me when using it for macro and micro-photography.  So, naturally I wanted to try it with the Hayear HR-1200R when I had a chance to show it to my granddaughter on her way to college.

I had previously given her my MRJ-03T microscope with a 5mpx digital camera that was pretty lame.  So, I wanted to see if she might like the HR-1200R.   However, because she had so much other stuff to carry to school this time, she left her microscope at home.  But, that didn't stop us from checking out the camera and measuring software in the HR-1200R's standalone configuration.

So, here are some images as processed through Helicon Focus:

First, a calibration slide to provide some sense of scale and resolution.  The small grid in the center of the circle is 1mm marked in .01 increments.

Calibration Slide - 1mm
 To demonstrate the resolution, here is a cropped version of that image.

1mm in 100 segments

With that in mind, here is an image of the stamen of a small flower.  This has NOT been processed through Helicon Focus.  It was captured using the EDF function built into the Hayear software.  This functions in a way that is similar to Helicon Focus.  But, is available in live mode as the capture is taking place.  Very nice.

HY-1200R EDF Image
Now we will show that same flower at a bit of a different magnification and apply Helicon Focus.

Stamen - Helicon Focus
If you click on the above photo and study the image carefully, you'll get an idea of just how nice the the HY-1200R is in standalone mode.

Here is the setup with the flow in standalone mode.

HY-1200R in Standalone Mode

My little demonstration is going to cost me some money because my granddaughter agreed that the HY-1200R is infinitely better than the camera now mounted on her microscope.  Not only was the image better; but, the software's measuring and processing capabilities are a biology major's dream when it come to being able to capture well documented images with annotation.

But, to really get the most out of the standalone mode, the stand will have to be upgraded to one that is a bit more rigid and having fine adjustment for focus.

That's the next upgrade.  But, that will also require a different lighting since the lighting is not built into the base.  Fortunately, Hayear ring lights are very inexpensive.

We've added another tool in our quest to understand ceramic 3D printing powders.  It's a small scale capable of reading in 1000th of a gram

HomGeek Micro-Gram Scale
As you can see, I have measured out 25 grams of Tethon3D Porcelain powder.  I will run this powder through 4 Talisman sieves with mesh values of 40, 80, 120 and 200.  I will then weigh each of the piles of powder to get a percentage of particles at the various sizes and capture the particle shapes with the HY-1200R.  This data will only be used to compare the different powders to see if we can predict performance when buying or creating future powders.

It should be very interesting for our students.


Thursday, August 22, 2019

What about the Materials Used in 3D Printing of Ceramics.


This is actually a prelude to a much longer article explaining the equipment and methodology behind it.

But, for now, let's start with an image that isn't all that exciting unless you, like me, are extremely interested in the materials you are using when embarking on a new 3D printing path.


Tethon3D Porcelain Ceramic Powder

Be sure to click on the above image to see the full size.

What you are seeing is Tethon3D's Tethonite porcelain ceramic powder as viewed through a microscope at 100X.  It's difficult to understand what we are seeing unless we have some context.

The sample you see was strained using a Talismon #120 mesh.  This is a medium mesh available from Talisman.  I had ordered a #200 but they sent me this in error.  Even so it is somewhat usefull.

Talisman #120 Mesh
To further understand the significance of this, a chart that relates mesh size to microns and inches is helpful.

Mesh to Microns
Only a small portion of the ceramic powder recipe made it through the mesh.  But, at least some did. 

As you can see, for something to pass through a #120 mesh it has to be less than about 125 microns or .125mm.  In the next article I plan to actually plan to attempt measure the smaller particles in this image.  But, if the clumps we see are less than 125 microns, then the individual particles are a whole lot smaller.

However, it may not be as easy as that.  It is my current understanding that ceramic particles in powder form are designed so that the particles have an electrical attraction to each other whereas ceramic particles in liquid "slip" form are meant to repeal each other.  It this is the case, then it may be that the individual particles made it through the mesh and bonded upon landing on the slide.

So, putting aside the question of particle size until we actually measure it, we can already see that the particles appear to be spherical.  While I'm no expert on the subject, this is exactly the kind of information I want to gather as we test various ceramic materials in our powder/binder printer so that we can make comparisons with properties of materials in relation to outcomes.

I plan to buy the entire range of these Talisman meshes for future tests and use them to perform a whole series of evaluations and data collection.

Equipment used

The microscope being used resulting in the image above is a C & A Scientific MRP-5000T.  

C&A Scientific MRP-5000T

While it is at the top end of the C&A line it's certainly not a Leica or Olympus.  But, it is a great value in terms of cost vs. performance.  Mounted on the MRP-5000T is a Hayear 12mp digital microscope camera.  

Hayear 12mp Digital Microscope Camera

After MANY attempts, for well over the past decade, of buying digital scope cameras costing MORE than the Hayear, I have FINALLY found a camera with which I am exceedingly pleased.  It is able to capture a full 12mpx image over a USB connection.  And, the free software that comes with it is infinitely better than any I've used in the past.  In fact, I am going to use that software to measure the particles for my next article.  Note that you will need a fairly inexpensive adapter for your particular microscope's eyepiece tube.  I was able to use this simple $7.49 23mm adapter.

23mm "C" Mount Eyepiece Tube Adapter
I actually bought the camera in a bundle with a stand and lens that allows me to also use it as its own self-contained microscope.  

Hayear 12mp Camera\Lens\Stand Bundle

This makes it doubly useful!  More on that in the next article.

Helicon Focus

By the very nature of the beast, ALL microscopes have limited depth of field.  One of the great features of the free Hayear software is that it can take a series of images at user defined intervals.  I used this to capture a series of images as I changed the fine focus of the microscope and used a wonderful program called Helicon Focus to combine the images into a single image having all of the target areas in proper focus.  

I have used Helicon Focus for more probably more than 20 years with all sorts of macro and product photography.  It is a great go-to partner for the Hayear 12mp because we start with such a great image.

To illustrate this point, here is a single image from that series followed immediately by the output from Helicon Focus.  

Single 12mp Image at 100X on an MRP-5000T
Helicon Focus Result

While even the single image is very useful, it's immediately clear that Helicon Focus adds to the usefulness enormously.

As we move forward with our exploration into all things ceramic 3d printing, we expect this combo of hardware and software to help play a pivotal role in expanding our understanding.  I'm certainly looking forward to it.  :)

Sunday, August 4, 2019

ComeTrue T10/M10 Due Diligence: TD3 Depowder/Recycling Station

A depowdering station that also serves a recycling role is essential when using a powder/binder printer.  ComeTrue3D has released the TD3 for this purpose.


ComeTrue3D TD3 Depowder/Recycle Station

DESKTOP FORM FACTOR

The TD3 is a desktop unit. The hinges are located on the side of the unit and the door is sealed with two latches.  In contrast, the door for the ZCorp ZD5, which is the depowdering station for the Z310,  is hinged at the top without using latches.  But, that is not the only difference in the door designs.  The ZCorp depowdering stations use brushes through which the user puts their hands to minimize dust escaping.  The TD3 appears to use gloves.  Frankly, the TD3's system appears to be the winner when it comes to not only fully containing the powder within the depowdering station; but, keeping the users hands and clothing clean as well.

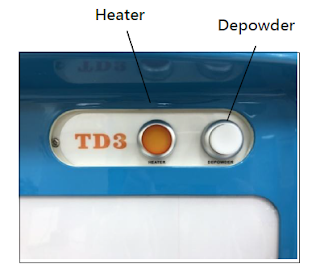
There are only two controls and they are on the front cover at the top right.  They are the Heater Off/On button and the Depowder Off/On button.

ComeTrue3D TD3 Buttons

HEATER BUTTON

One of the features of this depowdering station, that is unique in our experience, is the inclusion of a heat lamp to help dry the part.  This, as it turns out, is an even more crucial function when printing in ceramics than when printing in gypsum due to the differences in the nature of the binders used for the different materials.  This feature, alone, sets it apart from either of our ZCorp depowdering stations.

From the documentation it appears that the fully heated chamber is designed to surround the parts with an environment of 35C or about 95F to aid the drying process.

While we do not have a TD3, we have found a way to test the efficacy of heating at these temperatures by adding a heating system normally used in small egg incubators.  The IncuKit Mini from Incubator Warehouse.com is designed to heat small chambers at 99.5F; but, can be adjusted as needed.  It's $49.99.  Bigger units are also available and we may find we need to think somewhat bigger.

We'll test it in the ZCorp 310's print chamber, since the heater on our 310 does not appear to work and also in the ZD5 depowdering station to see how much difference adding heat makes to the quality of the final product.  I suspect that it will make a HUGE difference.

DEPOWDER BUTTON

The TD3 includes a small airbrush style compressor that outputs 23~25L per minute though the nozzle of the airbrush with a special cleaning tip.  Not having one, it's unknown whether the compressor runs continuously like that of the Z450 or cycles on and off as does the ZD5.  Both ways work.  In any case, it is important to learn the role distance plays on both safety for the part and effectiveness in cleaning detail.  This is true of all depowdering airbrushes,

As the powder is removed it drops to the floor of the cleaning chamber and holes in the floor not only allow it to fall to a collection box below; but, filter out any bigger solid pieces that should not be recycled.

NO BUILT-IN VACUUM

All of our ZCorp depowdering stations include a heavy-duty vacuum.  The TD3 does not.

Normally, one would think not having one would be a definite disadvantage.  I don't think that is entirely true.

I do suspect that not having vacuum that cleans the air in real-time might mean it's a bit harder to see what is going on as parts are being cleaned as the chamber fills with loose powder.  But, conversely, with the ZD5, we've found that we do NOT want the powder going directly into a vacuum cleaner's bag.

Our strategy is to use something known as a Dust Deputy Cyclone air cleaner that allows us to divert the captured dust from the depowdering station directly into a collection bucket.  This strategy would work quite well with the collection system of the TD3.  After a cleaning cycle, we would simply transfer the dust in the collection bin of the TD3 using an external vacuum with a Dust Deputy collection system.  This would put the dust into a container which we have custom designed to allow us to minimize the likelihood of dust being scattered into the working environment when being recycled and transferred back into the printer.

BENEFIT OF 3RD PARTY VARIABLE VACUUM

None of the built-in vacuums of which I am aware offer the benefit of having a variably controlled suction level.   There are at least two sources of HEPA vacuums that have variable suction capability.

One is the Foredom MADC20 Cyclone System.


One of the intriguing things about the MADC20 is that collection container appears to be easily mated to a custom 3D printed top that would minimize scattering powder when transferring back to the printer.

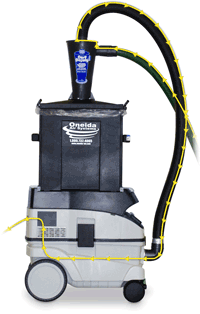
The other is the Festool CT series.

Festool CT 26 Variable flow Vacuum System

With the Festool CT vacuum series, there is the option of adding their cyclone collection system or using a Dust Deputy specially designed for mating with the Festool CT vacuum.
Dust Deputy Mated to a Festtol CT Vacuum


It will also accommodate our customized Dust Deputy collection system designed to minimize issues within the recycling workflow.

Because "green" parts are so fragile, having a vacuum with a flow that is adjustable should be invaluable.  Considering the cost of any of the ceramic printers, the cost of a vacuum with this advanced capability is almost negligible considering the value to preventing losses.

WATER TRAP

A door in the back of the chamber of the TD3 permits access to the water trap draining valve.  As air is compressed, particularly in a humid zone like ours, water is condensed out of the air.  Trapping that water is critical.  The designers of the TD3 have made it very easy to access and drain any trapped water.

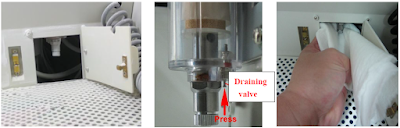
TD3 Water Trap & Draining
CONCLUSION

While it is always dangerous to reach conclusions without firsthand experience with a product, everything I have have read or been told leads me to believe I would actually prefer it to the ZCorp ZD5. 

I like the fact that it's a tabletop unit.  I love the fact that it has a heated chamber and I also REALLY appreciate the access system that should protect my hands, arms and clothing better.

One thing is not clear is how badly does not having a vacuum actively removing powder during depowdering going to affect the ability to see what is being done.  It appears to be of molded fiberglass construction.  So, I do not think it would be difficult to adapt an external vacuum to the TD3 if it would be helpful.  It might be helpful to point out that even though the ZCorp ZD5 has an internal vacuum, all of the hoses are connected EXTERNALLY.  So, the outcome of adapting the ZD3 would be exactly the same.

It seems to be a very nice, well considered product.


Ceramic Printer Video: Realistic Expectations and the Rewards of Tenacity

These pages are dedicated to introducing ceramic 3D printing to creative people at all skill levels and from differing backgrounds.  So, whe...