I wanted to be sure that I paid tribute to a tool that is going to be super valuable as we seek to become experts in ceramic 3D printing. But, I always wanted to have a bit of fun with the grandchildren when we got together over the weekend.
I have been using Helicon Focus for years beginning with the product photography I did for my daughter's artwork. But, it's especially fun for me when using it for macro and micro-photography. So, naturally I wanted to try it with the Hayear HR-1200R when I had a chance to show it to my granddaughter on her way to college.
I had previously given her my MRJ-03T microscope with a 5mpx digital camera that was pretty lame. So, I wanted to see if she might like the HR-1200R. However, because she had so much other stuff to carry to school this time, she left her microscope at home. But, that didn't stop us from checking out the camera and measuring software in the HR-1200R's standalone configuration.
So, here are some images as processed through Helicon Focus:
First, a calibration slide to provide some sense of scale and resolution. The small grid in the center of the circle is 1mm marked in .01 increments.
Calibration Slide - 1mm
To demonstrate the resolution, here is a cropped version of that image.
1mm in 100 segments
With that in mind, here is an image of the stamen of a small flower. This has NOT been processed through Helicon Focus. It was captured using the EDF function built into the Hayear software. This functions in a way that is similar to Helicon Focus. But, is available in live mode as the capture is taking place. Very nice.
HY-1200R EDF Image
Now we will show that same flower at a bit of a different magnification and apply Helicon Focus.
Stamen - Helicon Focus
If you click on the above photo and study the image carefully, you'll get an idea of just how nice the the HY-1200R is in standalone mode.
Here is the setup with the flow in standalone mode.
HY-1200R in Standalone Mode
My little demonstration is going to cost me some money because my granddaughter agreed that the HY-1200R is infinitely better than the camera now mounted on her microscope. Not only was the image better; but, the software's measuring and processing capabilities are a biology major's dream when it come to being able to capture well documented images with annotation.
But, to really get the most out of the standalone mode, the stand will have to be upgraded to one that is a bit more rigid and having fine adjustment for focus.
That's the next upgrade. But, that will also require a different lighting since the lighting is not built into the base. Fortunately, Hayear ring lights are very inexpensive.
We've added another tool in our quest to understand ceramic 3D printing powders. It's a small scale capable of reading in 1000th of a gram
HomGeek Micro-Gram Scale
As you can see, I have measured out 25 grams of Tethon3D Porcelain powder. I will run this powder through 4 Talisman sieves with mesh values of 40, 80, 120 and 200. I will then weigh each of the piles of powder to get a percentage of particles at the various sizes and capture the particle shapes with the HY-1200R. This data will only be used to compare the different powders to see if we can predict performance when buying or creating future powders.
This is actually a prelude to a much longer article explaining the equipment and methodology behind it.
But, for now, let's start with an image that isn't all that exciting unless you,
like me, are extremely interested in the materials you are using when
embarking on a new 3D printing path.
Tethon3D Porcelain Ceramic Powder
Be sure to click on the above image to see the full size.
What you are seeing is Tethon3D's Tethonite porcelain ceramic powder as viewed through a microscope at 100X. It's difficult to understand what we are seeing unless we have some context.
The sample you see was strained using a Talismon #120 mesh. This is a medium mesh available from Talisman. I had ordered a #200 but they sent me this in error. Even so it is somewhat usefull.
Talisman #120 Mesh
To further understand the significance of this, a chart that relates mesh size to microns and inches is helpful.
Mesh to Microns
Only a small portion of the ceramic powder recipe made it through the mesh. But, at least some did.
As you can see, for something to pass through a #120 mesh it has to be less than about 125 microns or .125mm. In the next article I plan to actually plan to attempt measure the smaller particles in this image. But, if the clumps we see are less than 125 microns, then the individual particles are a whole lot smaller.
However, it may not be as easy as that. It is my current understanding that ceramic particles in powder form are designed so that the particles have an electrical attraction to each other whereas ceramic particles in liquid "slip" form are meant to repeal each other. It this is the case, then it may be that the individual particles made it through the mesh and bonded upon landing on the slide.
So, putting aside the question of particle size until we actually measure it, we can already see that the particles appear to be spherical. While I'm no expert on the subject, this is exactly the kind of information I want to gather as we test various ceramic materials in our powder/binder printer so that we can make comparisons with properties of materials in relation to outcomes.
I plan to buy the entire range of these Talisman meshes for future tests and use them to perform a whole series of evaluations and data collection.
While it is at the top end of the C&A line it's certainly not a Leica or Olympus. But, it is a great value in terms of cost vs. performance. Mounted on the MRP-5000T is a Hayear 12mp digital microscope camera.
Hayear 12mp Digital Microscope Camera
After MANY attempts, for well over the past decade, of buying digital scope cameras costing MORE than the Hayear, I have FINALLY found a camera with which I am exceedingly pleased. It is able to capture a full 12mpx image over a USB connection. And, the free software that comes with it is infinitely better than any I've used in the past. In fact, I am going to use that software to measure the particles for my next article. Note that you will need a fairly inexpensive adapter for your particular microscope's eyepiece tube. I was able to use this simple $7.49 23mm adapter.
23mm "C" Mount Eyepiece Tube Adapter
I actually bought the camera in a bundle with a stand and lens that allows me to also use it as its own self-contained microscope.
Hayear 12mp Camera\Lens\Stand Bundle
This makes it doubly useful! More on that in the next article.
Helicon Focus
By the very nature of the beast, ALL microscopes have limited depth of field. One of the great features of the free Hayear software is that it can take a series of images at user defined intervals. I used this to capture a series of images as I changed the fine focus of the microscope and used a wonderful program called Helicon Focus to combine the images into a single image having all of the target areas in proper focus.
I have used Helicon Focus for more probably more than 20 years with all sorts of macro and product photography. It is a great go-to partner for the Hayear 12mp because we start with such a great image.
To illustrate this point, here is a single image from that series followed immediately by the output from Helicon Focus.
Single 12mp Image at 100X on an MRP-5000T
Helicon Focus Result
While even the single image is very useful, it's immediately clear that Helicon Focus adds to the usefulness enormously.
As we move forward with our exploration into all things ceramic 3d printing, we expect this combo of hardware and software to help play a pivotal role in expanding our understanding. I'm certainly looking forward to it. :)
A depowdering station that also serves a recycling role is essential when using a powder/binder printer. ComeTrue3D has released the TD3 for this purpose.
ComeTrue3D TD3 Depowder/Recycle Station
DESKTOP FORM FACTOR
The TD3 is a desktop
unit. The hinges are located on the side of the unit and the door is
sealed with two latches. In contrast, the door for the ZCorp ZD5, which is the depowdering station for the Z310, is
hinged at the top without using latches. But, that is not the only
difference in the door designs. The ZCorp depowdering stations use
brushes through which the user puts their hands to minimize dust
escaping. The TD3 appears to use gloves. Frankly, the TD3's system
appears to be the winner when it comes to not only fully containing the
powder within the depowdering station; but, keeping the users hands and
clothing clean as well.
There are only two controls and
they are on the front cover at the top right. They are the Heater
Off/On button and the Depowder Off/On button.
ComeTrue3D TD3 Buttons
HEATER BUTTON
One of the features of this depowdering station, that is unique in our experience, is the inclusion of a heat lamp to help dry the part. This, as it turns out, is an even more crucial function when printing in ceramics than when printing in gypsum due to the differences in the nature of the binders used for the different materials. This feature, alone, sets it apart from either of our ZCorp depowdering stations.
From the documentation it appears that the fully heated chamber is designed to surround the parts with an environment of 35C or about 95F to aid the drying process.
While we do not have a TD3, we have found a way to test the efficacy of heating at these temperatures by adding a heating system normally used in small egg incubators. The IncuKit Mini from Incubator Warehouse.com is designed to heat small chambers at 99.5F; but, can be adjusted as needed. It's $49.99. Bigger units are also available and we may find we need to think somewhat bigger.
We'll test it in the ZCorp 310's print chamber, since the heater on our 310 does not appear to work and also in the ZD5 depowdering station to see how much difference adding heat makes to the quality of the final product. I suspect that it will make a HUGE difference. DEPOWDER BUTTON
The TD3 includes a small airbrush style compressor that outputs 23~25L per minute though the nozzle of the airbrush with a special cleaning tip. Not having one, it's unknown whether the compressor runs continuously like that of the Z450 or cycles on and off as does the ZD5. Both ways work. In any case, it is important to learn the role distance plays on both safety for the part and effectiveness in cleaning detail. This is true of all depowdering airbrushes,
As the powder is removed it drops to the floor of the cleaning chamber and holes in the floor not only allow it to fall to a collection box below; but, filter out any bigger solid pieces that should not be recycled.
NO BUILT-IN VACUUM
All of our ZCorp depowdering stations include a heavy-duty vacuum. The TD3 does not.
Normally, one would think not having one would be a definite disadvantage. I don't think that is entirely true.
I do suspect that not having vacuum that cleans the air in real-time might mean it's a bit harder to see what is going on as parts are being cleaned as the chamber fills with loose powder. But, conversely, with the ZD5, we've found that we do NOT want the powder going directly into a vacuum cleaner's bag.
Our strategy is to use something known as a Dust Deputy Cyclone air cleaner that allows us to divert the captured dust from the depowdering station directly into a collection bucket. This strategy would work quite well with the collection system of the TD3. After a cleaning cycle, we would simply transfer the dust in the collection bin of the TD3 using an external vacuum with a Dust Deputy collection system. This would put the dust into a container which we have custom designed to allow us to minimize the likelihood of dust being scattered into the working environment when being recycled and transferred back into the printer.
BENEFIT OF 3RD PARTY VARIABLE VACUUM
None of the built-in vacuums of which I am aware offer the benefit of having a variably controlled suction level. There are at least two sources of HEPA vacuums that have variable suction capability.
One of the intriguing things about the MADC20 is that collection container appears to be easily mated to a custom 3D printed top that would minimize scattering powder when transferring back to the printer.
The other is the Festool CT series.
Festool CT 26 Variable flow Vacuum System
With the Festool CT vacuum series, there is the option of adding their cyclone collection system or using a Dust Deputy specially designed for mating with the Festool CT vacuum.
Dust Deputy Mated to a Festtol CT Vacuum
It will also accommodate our customized Dust Deputy collection system designed to minimize issues within the recycling workflow.
Because "green" parts are so fragile, having a vacuum with a flow that is adjustable should be invaluable. Considering the cost of any of the ceramic printers, the cost of a vacuum with this advanced capability is almost negligible considering the value to preventing losses.
WATER TRAP
A door in the back of the chamber of the TD3 permits access to the water trap draining valve. As air is compressed, particularly in a humid zone like ours, water is condensed out of the air. Trapping that water is critical. The designers of the TD3 have made it very easy to access and drain any trapped water.
TD3 Water Trap & Draining
CONCLUSION
While it is always dangerous to reach conclusions without firsthand experience with a product, everything I have have read or been told leads me to believe I would actually prefer it to the ZCorp ZD5.
I like the fact that it's a tabletop unit. I love the fact that it has a heated chamber and I also REALLY appreciate the access system that should protect my hands, arms and clothing better.
One thing is not clear is how badly does not having a vacuum actively removing powder during depowdering going to affect the ability to see what is being done. It appears to be of molded fiberglass construction. So, I do not think it would be difficult to adapt an external vacuum to the TD3 if it would be helpful. It might be helpful to point out that even though the ZCorp ZD5 has an internal vacuum, all of the hoses are connected EXTERNALLY. So, the outcome of adapting the ZD3 would be exactly the same.
It seems to be a very nice, well considered product.
I was going to move on to powder handling for my second "Due Diligence"; but, I got waylaid by my growing appreciation for the documentation available to us that provides a wealth of information as we do our research into the T10 and/or M10.
A good place to start is with a document I was late to find. And, that is a PDF that compares the T10 and M10 side-by-side.
Yes, you will find some spelling errors and typos in ComeTrue3D's English language documentation and web pages. But, don't let that fool you. There is a wealth of information that transcends ANY such minor flaws. Here are some things I learned from this one document.
Lines 1 through 4
Let's begin with the first four lines of the comparison table:
Model
T10
T10
M10
Application
Full-Color
Ceramic
Ceramic
Build Size
200x160x150(mm)
200x160x150(mm)
200x160x150(mm)
Max part size
190x150x140(mm)
100x100x60(mm)
100x100x60(mm)
We glean three interesting facts from these first four lines...
1. The T10 CAN Print in both Gypsum and Ceramic
The M10 is a less expensive version of the ComeTrue3D powder/binder printer that eliminates the full color capabilities to save money. But, it is not the only version that can handle ceramic powder. This is clear from the very first lines of the comparison sheet.
2. Color is Not Available with Ceramic Powder
Notice that the application doesn't split the two capabilities between Gypsum and Ceramic. It differentiates between Full-Color and Ceramic. I am trying to find out why. The aborted 3D Systems CeraJet ceramic printer could print in color using ceramic powder. So, I'm wondering if this might have something to do with 3D Systems patents, which would be aggressively defended.
Or, it could be an ink formulation issue where the current inks simply can't stand up to the heat. While it's an interesting question it is not a huge deal to us since NONE of the new ceramic printers can print in full color.
3. Build Size the Same but Part Size Differs by Application
Interestingly, when printing in ceramic powder, the allowable part size is reduced considerably. Nothing in the documents I've reviewed so far indicate the reason for this. It's certainly a factor in making a decision. True, it is very easy to use glaze to bond multiple parts during firing. But, even so it's hard to give the ComeTrue3D printers a 10 out of 10 when it comes to allowable part size when printing with ceramic powder.
Lines 5 through 10
In lines 5 through 10 of the comparison sheet we learn the following:
1. Type is "Desktop"
All of the models are classed as "Desktop" and are the same physical size.
2. Print Speed is 20mm per Hour
The great thing about powder/binder printers is that height is time. Unlike FDM printers, the difference in time between printing one item or 15 items is negligible. With a print speed of 20mm per hour, if the maximum Z-Axis is 60mm, then the longest print job would be about 3 hours plus the time to initialize a print job.
3. Layer Thickness Defaults 0.08mm, but, is Variable
Z-Axis Layer thickness is as little as 0.08mm. However, the listing for the M10 includes special modes specifically designed for developers wishing to use experimental powders. However, based on my earlier conversation with actual users, I'm thinking that this capability extends to the T10 as well. This would be a good question to ask your sales rep if you plan to use either of these printers in an experimental lab.
Lines 11 through 14
1. The M10 Permits "Print Time" and "Nozzle Slot" Selection for Developers.
Actually, this is talking about the number of times the printer applies binder for each layer. This is specifically provided to address the fact that "green" ceramic prints are more delicate than full color gypsum prints. ALL of the colors in the T10 are listed as "BINDERS". So, one can assume that full-color prints are sprayed with a bit more total binder in each pass than is a ceramic print. My understanding is that, being able to tell the printer to make multiple binder passes for each layer ensures that more binder is delivered and, theoretically, the 'green' part is a bit more robust.
The slot number selection may have to do with using experimental binders.
2. Horizontal Resolution is 1200 x 556 dpi
This is true of both the T10 and the M10 and is the same for both full color and ceramic. This is excellent resolution. But, remember, the true smoothness of a part surface is going to be determined by the powder used. Parts printed in fine powder will be able to benefit by this resolution better than those printed with a coarse powder.
3. The T10 uses TWO Print Heads and the M10 only uses ONE.
Both print heads on the T10 share the duties of dispensing color and binder. Since, the M10 is not a color printer, there is no need for a second head. Each head has 2400 nozzles for a total of 4800 nozzles on the T10. The print heads are MUCH larger than those on our ZCorp 450 or 310.
Lines 15 through 20
Most of the information in lines 15 through 20 demonstrate that the two different models are essentially the same in most categories of specifications. In summary both the T10 and M10:
Use the ComeTrue Print client software
Connect via USB 2.0
Are Certified for CE, FCC/IC
Operate in Windows 7 / Vista / 8 and 10
Operate at 100-210 or 200-240 volts
But, there is one significant difference in comparison line item 16.
The T10 Relies on .WRL Files for Printing Color
Both the T10 and the M10 can print from STL files. But, for color printing the only file type that it appears the comeTrue Print client can send to the T10 is the .WRL file type. Other common color file types like .OBJ, .PLY or .3DS must be converted to .WRL for printing.
This is not uncommon. The ZCorp Z450 requires "Vert color" .PLY or .WRL file types. But, it may be a new limitation to those not familiar with color printing. ComeTrue 3D has private labeled the "Pro" version of Netfabb as PixiRite Preparation Software. I understand that the cost is $1,500.
Since it is based on the NetFabb engine, it promises to be an excellent 3D file correction and converter software. While there is a "free" version of Netfabb available, it doesn't even come close to the power delivered by PixiRite.
Particularly if you are planning to capture 3D images for printing, I would urge you to seriously consider including PixiRite Preparation Software with your purchase.
We currently use Meshlab to make this type of file conversion. While free, it requires some complex workflow and we have not been entirely pleased with the conversions from .OBJ meshes to Vert color .WRL. Based on the little I've explore PixiRite, the whole conversion process looks cleaner and better. But, it is not something that I have been able to verify as yet.
Line 21
The final comparison in this document lists the consumables used by the T10 and the M10 in both full-color and ceramic print configurations.
Here is where it gets confusing...
Confusion #1 - Color Binders Under T10 Ceramic Column
I am not sure if this is simply an oversight or whether it's a hint that we can, in fact, use the color binders with ceramic. I have a call into the rep to clarify this.
Confusion #2 - Post Process Materials Included
In both the T10 and M10 ceramic columns, there are a number of materials that are NOT directly used with the printer itself. They are used only in the post-processing phase after printing is complete They are:
TP-81 (Ceramic Patch Powders) 200g)
TG-82N (Clear Glaze Powders) 500g
TG-82W (White Glaze Powders) 500g
All of these are powders that are mixed with water. TP-81 is used to fill cracks and holes that can happen when moving the part from the printer to the powder recovery booth. TG-82N and TG82W are powders meant to be mixed with water and applied as glazes in the final firing, if desired.
What is unclear at this point is the role of using a thin "slip" for the second firing cycle that permeates the part as is common with other ceramic powder workflows.
One thing is clear as I continue on my "Due Diligence" journey attempting to learn all I can about the ComeTrue3D series of powder/binder printers. Having had previous experience with ZCorp powder/binder printers helps me appreciate the thoughtfulness of MicroJet Technology's engineers as they designed these two printers. While there is still a lot to discover before choosing a printer for our future needs, it is clear that the quality of the candidate products is MUCH higher than I first suspected.
Anyone looking to buy one of the new breed of powder/binder printers is looking for a workhorse to support a serious business or educational function. These are NOT printers meant for hobbyists. And, that even includes the Kwambio Ceramo Zero Max having the lowest introductory price of about $5,000. All of the others are going to cost between $20,000 to $40,000. These include the Kwambio Ceramo Two, the xyzPrinting PartPro350 xBC, the ComeTrue3D T10 and the ComeTrue3D M10.
The enemy of that goal is downtime. So, part of the "Due diligence" responsibility is to try, as much as possible, to estimate what the vendor has done, both in terms of design and support to mitigate downtime. This is a bit tough when few machines are in the field and reliability history is in short supply. But, because it is essential to come up with the best evaluation as possible whatever the situation, we are forced to simply do our best by looking at what IS available. It would be wonderful to be able to wait until there are hundreds of users in the United States; but, we don't have that luxury.
I have to be honest, when I first began looking at the ComeTrue3D line of powder/binder printers all I saw were short slick sales videos with little real information. But, once I was able to talk with some users who had such great things to say about the A10 printer, MicroJet Technology and the Canadian distributor, it was clear that doing whatever it took to dig deeper was going to be well worth the effort.
The first goal was to find any and all documents and videos that would provide a more full understanding of the printer itself. So far this amounts to:
2 Overview videos
5 User documents
5 Intro - 1st Steps Videos
14 User Update & Repair Videos
4 Advanced Maintenance Videos
3 Cost Estimator Spreadsheets
2 PixiRite Software and Tutorials
I have taken the time to view each and every one of the videos and browse each of the documents.
This post will be limited to simply providing a summary of thoughts arising from reviewing the videos and documents surrounding the inking system. In subsequent posts I will delve more deeply into what I believe EACH of the materials reveal about the product and the philosophy of the company behind it.
First, MicroJet Technologies seems to understand the true situation of potential users in the United States. They are located in Korea. Their distributor is in Calgary Canada. And, we are thousands of miles away. The more we can help ourselves when issues arise, the shorter our downtime. The evidence that MicroJet Technologies understands our justified concerns begins with some fundamental design decisions as evidenced in the videos so far released.
It starts with, potentially, the most vulnerable parts, those of the INKING SYSTEM.
We have an old ZCorp Z450 color powder/binder. The designers decided to rely on then easily available HP B/W and Color print cartridges for the basis of their inking system. The same is true for the ZCorp Z310 Plus that was just donated to YouthQuest Foundation. While the HP cartridges used in the Z450 are still available, the HP10 used by the Z310 has not been manufactured since 2016! They can be found on eBay; but, they are extremely old and at some point will NOT be easily replaced. The most frequent errors thrown by the Z450 are printer cartridge "POGO" errors requiring replacement before proceeding.
Microjet Technologies uses their own cartridges. This makes sense because they are a huge manufacturer and innovator of inkjet print heads. What's more, the cartridges are continuously filled by large bottles of ink! You don't replace a cartridge when the ink runs out. You simply replace the bottle of ink... the least expensive part.
Not only is this strategy far less expensive than using a small conventional ink jet printer cartridge, with the T10, it means that materials other than colored ink can be fed through the cartridge. One of the existing users is doing just that. They are experimenting with using multiple binder types at the same time. They can even color the secondary binder if they want. this kind of versatility is not only useful in research, it tells us the value of the design. It may seem like an oxymoron; but, it's a closed system (proprietary cartridges) that is also OPEN (user supplied inks & binders).
So, lets start with the ComeTrue T10 3D Printer Installation Video that illustrates our point.
There are a number of things to point out in this video that tell us a lot about the philosophy behind the design of the T10 and that carry over to the M10.
Loading Ink and Binder is Software Assisted
The client software that comes with the T10 or M10 has a Maintenance Tool Tab that positions the printer carriage to the correct place for both loading materials or cleaning the print heads.
Easily Accessible Liquid Consumables
All of the liquid consumables are located outside of the printer. And, the status of all of the liquid consumables can be ascertained well in advance of running out of one of them. While we would take the precaution of having at least one of each replacement on hand, it's still a good feeling that we would know well enough in advance we were getting low on something in time to order a replacement.
The liquids include inks (Cyan, Magenta, Yellow and Black), binder and cleaner.
It's also nice to know they are LOCKED into place!
The Liquid Feed System is Ingenious and Simple
The ink flows through tubes, having insertion pins, to the print heads . The clips that permit locking a tube are color coded and the print heads themselves are very easily inserted. The video cautions the user to make sure that both print heads are completely in place. That's easy enough.
Cleaner Dispenser is Built In to the System
We
appreciate the fact that the cleaning system is an integral part of the
design of this printer. While other videos show that we still have
some manual cleaning to do, it's nice to know thatat least the major cleaning functions can be handled from the client software itself.
The video demonstrates that the cleaning process is done when the cartridges are initially loaded and can be repeated later as needed.
Also, it should be noticed that the level of cleaning is user selectable.
Summary for Due diligence #1
The inking system of the ComeTrue T10 (and consequently the M10) is a HUGE improvement over the inking systems used in the ZCorp powder/binder printers we now own.
While the savings won't cover the costs of buying a ComeTrue, they should be significant. But, the real benefits should come from less down time from "POGO" errors involving the older HP print heads. And, ultimately, having the same manufacturer responsible for both the printer and the print heads should ensure that the situation where the print heads are discontinued for otherwise viable printers should never happen with the ComeTrue 3D printers.
The simplicity and versatility of the inking system is also a positive factor. The fact that one user is replacing a color for an extra binder tells me that the system is not preventing users from finding alternative materials. In fact, I am told this openness extends to the powder as well.
This not only is a big positive about the printer; but, says a lot about MicroJet's customer centered design philosophy.
Finally, our current color powder/binder printer is CMY, with the black cartridge being emptied and used for dispensing binder. Obviously, black features are rarely black. But, it also affects ALL the color tones. The CMYK system of the T10 promises to be a hugely significant improvement.
I give the inking system a 10 on a scale of 1 to 10.
UPDATE: After fighting to find good HP10 cartridges for 7 plus hours for the ZCorp 310, I am more convinced than ever that the newer printers, like the ComeTrue T10 and M10 HAVE to be a vast improvement. Finally got thr 310 to print; but, it was touch and go for a while.
This post is NOT going to be a review because I do NOT have a ComeTrue 3D Ceramic printer with which to conduct a review. It is simply a public disclosure of my private investigation into a possible candidate for us to purchase in our quest to print in ceramics.
Nothing should be read into this report because it is the first printer I am relaying any results of my research. It's simply the only new ceramics capable powder/binder printer under $50,000 with which I am aware that is actually in the hands of users.
So, far I have been able to talk with two persons having experience with the ComeTrue T10 full-color powder/binder printer and the North American distributer. While this is not a wide swath of people, we have to rely on where we are now and that is a small user base so far. Neither had the M10 version; but, if anything, one might expect the A10 version would be more complex and prone to failure. At least that is my assumption. Again, we're going with what we have.
Both contacts were in university settings. One was in Texas and the other in Wisconsin. Here are my summary reports 1. Manufacturer's Background (MicroJet Technology)
The ComeTrue line of powder/binder printers is manufactured by MicroJet Technology located in Taiwan. They were established in 1996. While they produce a range of products, it appears that they are best known for their thermal bubble inkjet printheads, inkjet cartridges and "CurieJet" liquid micro pumps. With this in mind, it makes sense that they decided to tackle powder/binder printing since all of these elements are at the core of powder/binder print engines. That being said, one would be hard pressed to be able to intelligently evaluate the ComeTrue printer based on any information found in the MicroJet Technology web site. Their dedicated site for the ComeTrue line of 3D printers, found at https://www.cometrue3d.com/en/ is a bit more helpful, it is still left up to the visitor to find out truly helpful information.
In short, in my mind, now that I know more, their web site does not truly reflect the value of their product and their commitment to a buyer. That simply means one has to dig a bit deeper to find the gems and I was motivated enough to do so.
2. North American Distributor (Super 3D Plus Inc)
The North American distributor is listed as "Super 3D Plus, Inc" in Calgary, Canada. But, when you click on the link, it takes you to http://www.calgary3dprinting.ca/. Confused? So was I. And, what was particularly confusing is that there wasn't a single reference to the ComeTrue 3D printer on the home page. It's only after you click on the "3D Printers and Scanners" link, that takes you to a page for a company called 4G Vision Tech, that you find the ComeTrue 3D printer among a host of other consumer printers and scanners.
I don't blame you if you think things are getting a wee bit sketchy here. And, if I told you that I called four times without actually reaching a person, I wouldn't blame you for thinking me very foolish to proceed.
The good news is that when a real person called me back, they sounded like they actually knew what they were doing and had some very good responses to my naturally leery questions. But, the best response was that not only have some ComeTrue 3D printers been delivered to customers in the United States; but, they would help put me in touch with them so that I could found out a real user's experience directly from the user. 3. Current Users are Serious Academic Research Facilities
I hope I can be forgiven for expecting the user referrals would take me to somebody working alone in a basement that nobody could validate. But, I was certainly wrong. I was given 3 names from two prominent technical universities using the printers for serious research. As I noted earlier, one was in Texas and the other in Wisconsin. I looked up all the referrals to confirm their credentials before contacting them. Very, very pleasantly surprised.
4. ALL Users Reported EXCELLENT Support
My first question, of course, was "Is it real?" Given that was answered in the affirmative, I then went on to ask about reliability and support issues. Every single user had nothing but great things about Rafal and Gary, their distributor contacts. Moreover, they were effusive about the support they got from the engineering team in Taiwan! This support even rose to the level of adding custom features into the client software to support the specialized materials with which they were experimenting.
5. THE perfect Research Platform
These users were going well outside the normal range of uses because they were using the ComeTrue to experiment not only with custom powders; but, unique binder combinations. If anything was going to stress the ComeTrue A10 it is the work these users are doing. In fact, one called the ComeTrue THE perfect experimental platform for high peformance ceramic research. That was because they could so easily swap out powder materials and use a mix of custom binders.
By the way, one is operating with powder MUCH finer than the stock material, which sounded very interesting.
6. Parts are Reasonable.
Because the supplier is in Taiwan and my own experience with powder/binder printing says things WILL eventually break it was important for me to find out the costs of expendables and replacement parts, like boards, that might bring our operation down. The printer was described as relatively uncomplicated with affordable parts that could be kept on hand in case of emergencies. Printheads, for instance, have a mean-time failure rate that is fairly constant. So, having a spare around is a good idea. Since the user relating this information also had ZCorp printers, they pointed out that the life xpectancy of the ComeTrue parts was better than the HP printheads used in the Zcorp printers. 7. Tentative Evaluation
Since none of the users actually owned an M10, it's impossible to reach a firm conclusion from a couple of phone calls and emails. But, I've not heard a single bad thing about the ComeTrue platform. In fact, they only thing remotely negative was simply to point out that the print area is more limited that the old ZCorp 3D printers. And, I already knew that. While a factor in making a final decision, it's just one of many considerations.
Quite frankly, I am VERY impressed by what actual academic researchers had to say and I not only have a very positive outlook about the team at the distributor; but, the commitment of the team in Taiwan to deliver a positive user experience to owners.
If you are in North American you can reach the distribution team through this contact page:
I have had the privilege of being able to experience many forms of 3D printing, from very low cost consumer FDM 3D printers to professional Multi-Jet 3D printers costing nearly a hundred thousand dollars. But, my favorite 3D printer type has always been powder/binder printing.
Perhaps first and foremost, you don't have to deal with vexing supports marring complex and beautiful finished parts. The powder is, itself, the support system and it is easily blown off the part at the end of the print. But, another reason is that it is a surprisingly clean and safe method of printing. In my mind it is MUCH safer and, ultimately, cleaner than liquid resin SLA.
Ceramic 3D printing, could be within reach of designers and artists, has been around for a while in the form of extrusion printers using a form of semi-liquefied clay. May clay artists have found this method of printing to work well for them. Extrusion clay printing has definitely been of value to others; But, it's never had an attraction for me. Maybe I know that I'm just too lazy to clean up the mess after the print is done.
Earlier posts have talked about my experience with ceramic resin using a Formlabs Form2. While we seem to be making progress with reliability, and it definitely has a place for small, intricate items like making ceramic jewelry. It still is NOT a method I would want to count on to build a 3D ceramic printing business due to the print times. It is not particularly well-suited for scalability.
I'm just going to say it. My bias is toward powder/binder, which is remarkable since I personally have not printed a single ceramic item on a powder/binder 3D printer. The problem up to this point is that unless one was willing to spend several hundred dollars there were no powder/binder printers dedicated specifically for ceramic powders. One had to modify a gypsum powder/binder printer and find a 3rd party to supply an appropriate ceramic powder and accompanying binder.
Ceramic Powder/Binder Printing to this Point in Time
Tethon (Tethon3D.com) is one such company. They provide several clay based powders to those who wanted to convert older ZCorp 310 printers to create ceramic 3D objects. At YouthQuest Foundation, we were just given a surplussed ZCorp Z310 Plus by the Fairfax County School System.
ZCorp Z310 Plus Powder/Binder Printer
Like our ZCorp Z450 printer, the 310 is designed to use a gypsum powder. But, unlike the Z450, it is monochrome. And, more importantly it does not rely on a cartridge binder supply system. Binder is poured into a container on the right side of the machine, allowing for the use of 3rd party binders. And, because the 310 is no longer supported by any manufacturer there is no risk of voiding a warranty because this is none. When we obtained it, there was no print cartridge installed. So, we have no idea if or when we might be able to get it up and running. But, if and when we do, we will test one or more of the ceramic powders available from Tethon3D.
The down side, even if it does work well, is that it uses an HP 10 printer cartridge and, while they are still available on eBay, they have not been manufactured since 2016! So, it is NOT a printer upon which we can rely too far into future. Sooner or later even if one could find an HP 10 cartridge, the chances of it working would be slim to none. But, for now, it is our best hope to begin our journey into printing in ceramics at the lowest possible cost and risk.
New Options: Kwambio & ComeTrue
A week or go, I would have written that there were only two new options for printing ceramics in 3D that was anything close to being a reality. And, those options came from the same company, Kwambio. The Ceramo Zero Max, at around $5,000, is the low-cost option and the Ceramo Two, at around $40,000, is the professional option. (Prices might vary when actually released) But, now I know that there are two viable companies making viable ceramic powder/binder printers. Let's first examine Kwambio.
Kwambio - Ceramo Zero Max, Ceramo Two
The primary printer I've been following for the past few months is by Kwambio.
We also have a sample part printed on a Kwambio ceramic printer.
It has a wonderful feel and finish. So, we know that it can produce beautiful ceramic prints. I wish I could tell you more; but, as far as I know, there is not a single Kwambio printer in the field as it has yet to ship. Do I believe it's real? Yes. But, until I visit the Kwambio offices in Hartford, CN, I am completely relying on the part I have in hand and the great communications I've had with Kwambio's sales and marketing teams.
Microjet- ComeTrue
For over a year, I have been following reports that two new powder/binder printers were reportedly being readied for market by Asian companies. One was by SkyTech and was called the 3DPandoras. So, far the 3DPandoras is what we used to call in the video game field, "Smoke & Mirrors". From what I can tell, so far, all they have managed to achieve is to make their kickstarter customers demand their money back. While that could change in the future, I'm not counting on the 3DPandoras any time soon.
Until a week or so ago, I would have told you that the ComeTrue ceramic printer was ALSO most likely smoke & mirrors. But, while reading about Tethon3D powders, I stumbled upon a reference that their powders also work in the ComeTrue M10 3D printer. Hmmm... how could they know unless there was an actual ComeTrue printer with which to test it. So, I made a concerted effort to see if, in fact, the ComeTrue printers had started shipping into the USA.
It took some effort; but, that effort paid off when I was actually able to talk with the North American distributer and quickly got some references for actual users.
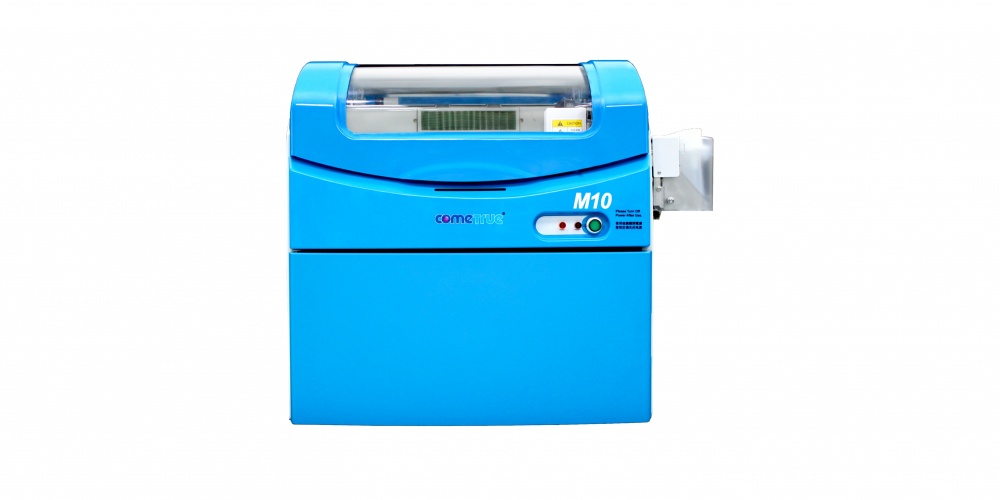
ComeTrue M10 3D Powder/Binder Ceramic Printer
It should be noted that the users with which I've talked have the full-color A10 version. But, the reviews I'm getting so far, are largely positive and realistic. If they reported that a new powder/binder printer was absolute perfection, I would have dismissed them immediately. After all, we've lived with the Z450 for more than 5 years and pay a hefty price for support just to keep it running! But, what I have heard is that while there have been minor issues, the response by the support teams in both North America and abroad have been swift and helpful. That is wonderful news.
The ComeTrue M10 is their ceramic specific printer. I understand that the delivered price, with training and installation, comes in at around $20,000. So, it falls between the two Kwambio offerings in price. However, I have NOT seen a sample part. But, here is a video that might be helpful.
If and/or when I get my hands on an actual sample I will let you know.
NOT EITHER/OR
For our application to be successful, we need to be able to print at production levels. And, the most important factor is mitigating down time. All 3D printers fail. And, that is a given for a powder/binder printer. The issue is not a failure; but, how well you can avoid having that failure disrupt your business catastrophically. And, that probably means building in redundancy.
For an individual artist already creating ceramic works of art manually, a single $5,000 Kwambio Ceramo Zero Max is AUGMENTING your income. So, being down for a day or even a week isn't catastrophic. But, for others, sharing the down-time risk over 3 lower cost printers might be a better strategy than purchasing a single high cost printer.
If we are successful in the endeavor we have planned, which will provide employment and training for at-risk students on the autism-spectrum, our ultimate strategy might be to have several $5000 printers, a $20,000 printer and a $40,000 high-volume professional printer in order to provide the highest levels of performance and quality while mitigating the affects of temporary failure by sharing the load over several print platforms.
The point is that having multiple choices is terrific. As I learn more about each of these options I will be quick to share them with you.


